• Photography
  • About
  • Contact
  • Light Writing

Scott W Gonzalez

  • Photography
  • About
  • Contact
  • Light Writing

Revisiting Photographed Locations

Good Morning,

If one has been photographing a while they probably have an old haunt that they enjoy photographing. Some of us do not though feeling that it has already been photographed. Different times of the year can yield greatly varied results, even a different time of day can, or a different mind set even. 

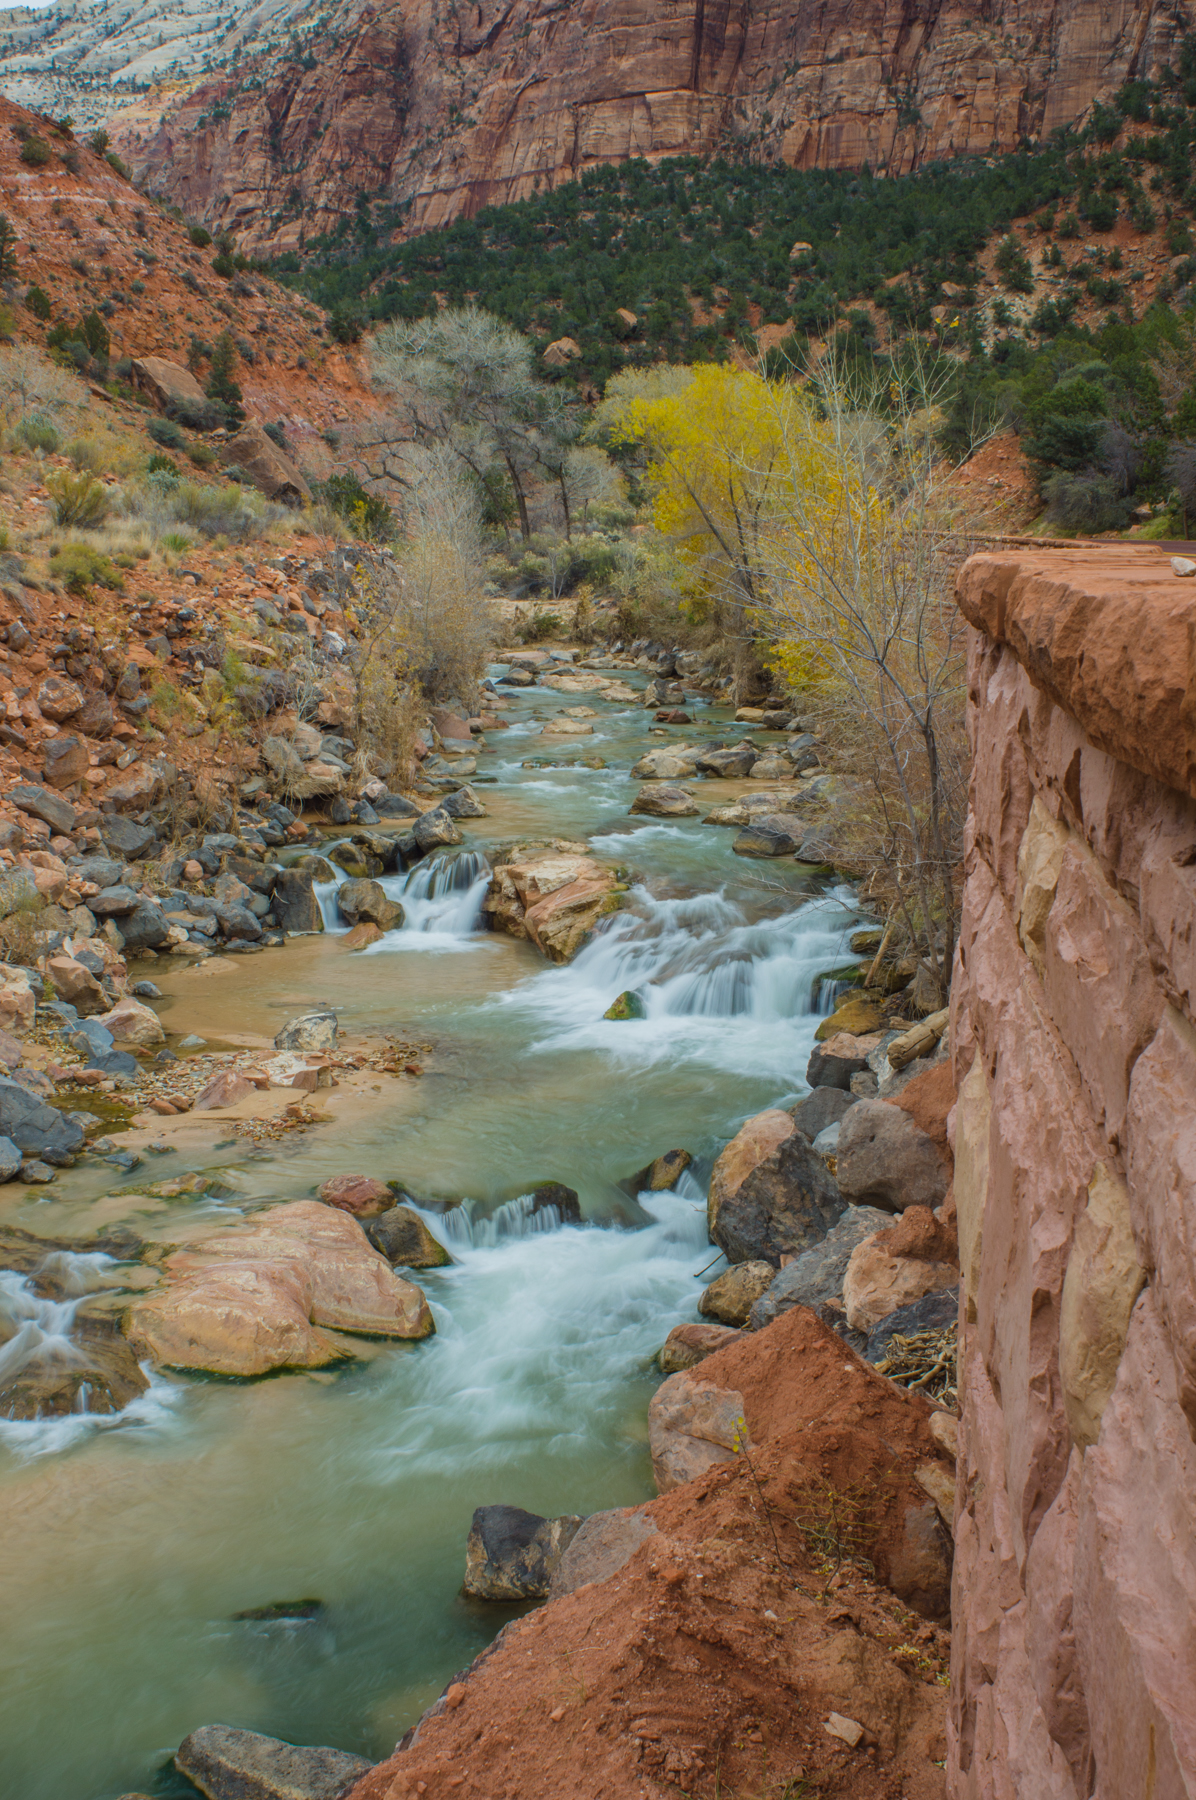
Below is the same location. One shot during a rain and the other shot the day after one, granted the rains were nearly a year apart. The two images have a completely different feel to them. Same camera, lens, tripod, and focal length. They were taken probably 6 feet or so from each other too. 

This was a calm pool taken the day after a rain in Red Rock Canyon National Conservatory. I found this spot while I went hiking with my daughters and it was empty. I knew I had to come back after a rain and photograph it.

This was a calm pool taken the day after a rain in Red Rock Canyon National Conservatory. I found this spot while I went hiking with my daughters and it was empty. I knew I had to come back after a rain and photograph it.

After taking the calm picture and how full the pool was I wanted to come back during a rain and see it with flowing water.

After taking the calm picture and how full the pool was I wanted to come back during a rain and see it with flowing water.

So those places that capture us should be looked at again and imagined in different times of day or year, with different weather, etc. The results might be ho hum or they might be spectacular. So grab a camera , revisit locales, and go out and shoot.

Can wait to see what is produced.

~Scott

tags: weather, education, location, difference, time, wide angle, same
Thursday 02.01.18
Posted by Scott W Gonzalez
 

Post Processing: Presets

Good Afternoon,

Today we are going to discuss presets in post processing as the title said. There are many options for processing RAW files. Cameras generally come with their own software and it can be all that we need. Other times we need to go outside of what the manufacturer provided. Lightroom, Photoshop, Capture One, Affinity Photo, DxO Photolab, and many others. I generally use Lightroom to process images and Photoshop if I need to do some more serious editing.

In Lightroom there are presets already present. B&W: Filter, Toned, and just B&W, then Color presets, General presets, and Effect presets which are all fine and dandy for general use. We can make our own though which can be applied during import. It can be brought down to very specific settings. What we do is open our RAW file then adjust it to our liking then save it through the Develop pull down menu. There is a New Preset option or we can hit ctrl/cmd+shift+N. Now this is more for something that will be used often, (such as noise reduction for different ISOs, portrait with a flash, outside portraits, landscapes, sunsets, etc) if we are looking for something just for one group of photos then we can copy (ctrl/cmd+C) and paste (ctrl/cmd+V) the setting to each image or a group in the grid view. This is just a starting point for when importing images to lightroom, not every landscape we do will be optimal for these settings it beats starting from scratch on each shoot.

Here is where we can apply the presets during import and below the circled setting is Metadata that can be applied as well. If the preset is saved we can skip a step in post.

Here is where we can apply the presets during import and below the circled setting is Metadata that can be applied as well. If the preset is saved we can skip a step in post.

Here are where any presets we create end up. Sony Standard is my normal and mimics what I see through the viewfinder on Standard setting and is a good starting point.

Here are where any presets we create end up. Sony Standard is my normal and mimics what I see through the viewfinder on Standard setting and is a good starting point.

This is the settings for my own Standard which is usually where I end up with outdoor scenes. Mind you this is for a Sony SLT so it might not work that well for a Canon, Nikon, Fuji, Pentax etc.

This is the settings for my own Standard which is usually where I end up with outdoor scenes. Mind you this is for a Sony SLT so it might not work that well for a Canon, Nikon, Fuji, Pentax etc.

If lightroom is not what is used there are ways to make our own presets there as well. Now go out and shoot then make a preset or two to edit the images.

~Scott

P.S. there is a comment section under each post I would enjoy hearing from you all and seeing pictures.

tags: photography, photo, education, editing, processing, preset, post, teaching, training, setting
Tuesday 01.16.18
Posted by Scott W Gonzalez
 

Post Processing

Good evening,

So we have yet to talk about post processing. Something that is sometimes frowned upon. People sometimes say things like "they didn't used to process pictures," "with film they didn't have photoshop," or tagging pictures with "#unfiltered/#nofilter," or "SOOC/Straight Out Of Camera." Well here is a little secret, film images did get processed, and a jpeg SOOC is processed by the camera's computer. So the idea that post processing is new or something to frown at is flawed. Granted if an image is heavily processed or edited to make it unreal then it should not be passed off as a regular image. There is a place for it though just like everything else in photography.

Back in the day of film, images were edited in the darkroom. An image could be cropped, enlarged, brightened, darkened, burned, dodged, solarized, multiple negatives could be layered or combined, multiple negatives could be shined on the paper, and probably many other edits could be done. If two different people or even the same person at different times processed an image it would probably come out looking different. Some of the edits even came over into digital photo processing and retained the same name. The only images that I can think of that were not processed by human "hands" are polaroids, pretty much every other one has been in some way or another.

I will talk about actual post processing in 2 weeks, which is what I am going to be changing the schedule to. Next one should be the 16th. Go out and shoot.

~Scott

A polaroid of my Dad and my oldest Nephew in the mid to late 80s. No processing until I scanned it.

A polaroid of my Dad and my oldest Nephew in the mid to late 80s. No processing until I scanned it.

tags: post, processing, e, teaching, training
Wednesday 01.03.18
Posted by Scott W Gonzalez
 

Situational Packing

Good morning,

Sorry it has been so long, work and holiday stuff has been taking  a toll. Today we are going to talk about packing gear. Most photographers have more gear than can easily be packed into something that is portable like a backpack. Take the example below.

This is digital cameras a57 on top and a77 on the bottom, then lenses and flashes. This is just the basics not counting chargers, batteries, filters, etc. For size reference each square is 6 inches.

This is digital cameras a57 on top and a77 on the bottom, then lenses and flashes. This is just the basics not counting chargers, batteries, filters, etc. For size reference each square is 6 inches.

Now most of us probably don't want to have a rolling suitcase in tow or have the ability to have an assistant carry our gear. Most people opt for a backpack or an over the shoulder bag for storage.

Here is my trusty camera bag with a storage area on top. With kids as travel companions it is quite handy. Even with the flap open is doesn't cover the same amount of 6x6 tiles that my gear does.

Here is my trusty camera bag with a storage area on top. With kids as travel companions it is quite handy. Even with the flap open is doesn't cover the same amount of 6x6 tiles that my gear does.

Situational packing is key for this situation. We can't always bring every piece of gear that we have. First off we can knock out one long zoom, not great lighting anticipated take the faster 70-210 f4, or do we need a little extra zoom the 75-300mm f4.5-5.6 is better. Is macro photography the goal, take the 50mm f2.8 macro if not then the 50mm f1.7. Just those 2 drop it to 6 from 8. Now comes the trickier part. Are wide landscapes or getting the whole room in the frame the goal? If so take the 11-18mm instead of the 35-70mm. If not then we can switch those. If we are taking the 35-70 then the ultra wide and 50mm can be left at home unless you need the 50 for macro. Keeping one lens with a wide aperture is a good rule, in this case it is either one of the 50mm lenses or the 28mm f2.8. The 35-70 covers the 50mm range so the 28mm would be in the bag, if the 11-18 is going then so is a 50mm. Through our image processing software we can see which lenses we use the most to help decide what to pack. Just what has been covered with the lenses cuts them by half.

Not everyone has more than one camera body. So this might not pertain to everyone. If we do though then this is a choice to be made as well. If the situation requires a quick lens change or missing the shot (wedding, sporting event, children playing, etc) then bring two if not then one should suffice. If the environment is not a place we want to change a lens (windy, sandy, dusty, etc) then bring two with the lenses attached that will most likely be used. Most times one camera is fine.

Now to the flashes. If you need them bring them if you don't then don't. If people indoors or in shaded areas are the subject being them though. There are so many times that a fast lens doesn't suffice in those situations.

I will be adding a picture soon of typical packing for different situations.

tags: Packing, Lenses, Camera, Limiting, education, teaching, telephoto, macro, Flash, wide angle, histogram
Thursday 12.21.17
Posted by Scott W Gonzalez
 

Constant Lighting Situation

Good evening,

Tonight we are going to talk about indoor lighting or constant light. Quite a few people this holiday season are going to be in a situation where the light is constant, however this can trick our sensors. Let's say we are indoors at a dinner with the family and decide to take some candid shots. The lighting at the table is relatively constant. Now our cousin is wearing a dark red sweater and our uncle is wearing a light salmon colored shirt. If we focus on our cousin the exposure is too bright and if we focus on our uncle the exposure is too dark. So what is a photographer to do in this situation. Turn it to manual mode then set the shutter and aperture to were it exposes everyone one the way we want.

_DSC9967.JPG
_DSC9968.JPG
_DSC9969.JPG

In this example we have my Wife's Christmas Village. The metering spot was changed by a few inches for each image which resulted in 1 stop of exposure difference. The difference between an uncle and a cousin would probably be greater and so would the small light changes. These were shot in Av mode the first was metering from the snow 1/160s, second was on the reindeer 1/125s, and third was on the pine trees 1/80s. In this example the difference could be made up easily in post. With holiday photos most people want them sooner rather than later so the less editing that needs to be done the better. If possible adjust the settings before hand, if not use your preferred setting to get an idea of where you want to be then lock those settings in using manual. Those split second moments don't wait for a cameras metering system. So switch it to manual this holiday season and go out and shoot.

~Scott

tags: manual, aperture, adjustment, family, holidays, program, shutter, priority
Tuesday 12.05.17
Posted by Scott W Gonzalez
Comments: 1
 

Magazines

Good evening,

Magazines are a common item to acquire and they often have a useful article or two in each edition. Now keeping a magazine for one article is a little much. Unless we are collecting them to keep in pristine condition as a collectable or because one has been featured in it. Most of the time that is not the case though. I am going to pass on what I do so I don't have stacks and stacks of magazines all over the house.

I took a 3 ring binder and some letter size sleet protectors. I then cut out the articles that I want to keep, staple them together, then recycle the rest of the magazine. Most of it is just advertisements. For the same size as 5 mags we could have about 10 pages worth of articles (and that is being generous most of the time it is 5 pages) from 25 editions or over 2 years worth a monthly subscription.

A 3 ring binder and some sheet protectors

A 3 ring binder and some sheet protectors

Granted most articles are online now so they could be saved on the computer or cloud and that is fine. Magazines are still being printed so people are still buying them and storing them too. This post wasn't really about photography directly. I just got a copy of a magazine and thought that I would share my storage process with you all. So take the previous information and go out and shoot.

~Scott

tags: storage, magazine, education, photo, photography
Thursday 11.30.17
Posted by Scott W Gonzalez
 

Shaped Bokeh

Good day,


Quite a few of us are planning on taking holiday photos. If we want something a little different shaped bokeh is a possibility.

I went with hearts, those are christmas lights in the back. In the front is a little dog my children made.

I went with hearts, those are christmas lights in the back. In the front is a little dog my children made.

Hearts, stars, silhouettes, trees... Nearly any simple shape is an option. There are kits that can be bought from what I have seen the shapes are limited and the reviews say they work alright. Once we get the hang of making the cut out it is easy.

Required items are a large aperture lens (the larger the better), some black construction paper, tape, a sharp cutting instrument, a white crayon, lights, and a shape that is smaller than the largest aperture of the lens. Optional is a lens hood, step ring, or square filter holder.

I use a 50mm 1.7 Minolta lens, then cut out a square to fit the ring for a square filter holder, I draw the shape with a white crayon, cut it out with a sharp knife, then tape it to the ring (the paper could just be taped to the lens), I then set up the lights (candle flames, christmas lights, fairy lights, etc) and purposely put the lights out of focus. The distance from subject to lights in the above image was about 5-6 feet. Put them too close and there isn't a shape, put them too far and the image is too small.

Sorry this was late I was in Zion for a few days, updated pictures in the Zion folder will be in the next few days. We even took our family picture with only one take. Make some shapes and go out and shoot.

~Scott

tags: photography, holiday, teaching, education, example, fun, shaped, bokeh, aperture
Friday 11.24.17
Posted by Scott W Gonzalez
Comments: 1
 

Lenses: Focal Lengths

Good Morning,

Today we are going to talk about focal lengths and their effects on images. We have discussed different focal lengths and what they are generally used for. We have not talked about how they affect the image or rather the relationship between subject and background. Below is a series of a red rose with a praying mantis on it in my backyard. I tried to stay focused on the same spot of the rose but moving and changing lenses does not help, thankfully the wind didn't give me any issues. First image is at 11mm, some distortion can be seen on the wall and the area of focus is wide and it looks like the wall is pretty far away. The second is at 18mm and the wall looks closer, pretty much everything looks closer or tighter, the distortion at the wall is negligible, and praying mantis is still judging us. Third we have 50mm and we can barely see any of the wall, the image is a bit brighter, I didn't have it on manual and it changed shutter speed was changed in Av. The honeysuckle doesn't look as far as it did before and out area of focus seems to have shrunk.  Fourth is 100mm and it was switched to manual mode. The praying mantis is so judgemental and has been for a while. It appears that the honeysuckle is just behind the rose bushes leaves and is rather out of focus. Fifth and final image is at 300mm, sorry the angle changed a little to keep in the same size I had to go up a step. The mantis stared directly at the camera, finally. The leaves are hard to make out on the honeysuckle now and look pretty close.

_DSC6558.JPG
_DSC6559.JPG
_DSC6560.JPG
_DSC6561.JPG
_DSC6563.JPG

As can be seen through the images. If a subject is kept the same size the relationship with the background can be greatly affected by the focal length of the lens. What we are trying to convey with our images can be changed by zooming. Now go out and shoot.


~Scott

tags: focal length, camera, teaching, education, example, equipment, lens, telephoto, wide angle, normal
Tuesday 11.14.17
Posted by Scott W Gonzalez
 

Equipment: Specialty Lenses

Good Afternoon,

I am planning on changing the posting day to Tuesdays. Sunday just seems rushed. I meant to post this last Tuesday my life has been a little hectic. Next post day should be the 14th unless tomorrow goes amazingly well then I will have a post on 7th.

Last time we talked about regular lenses. Now we will go over specialty lenses. There are quite a few Lensbaby has a whole line, and there are tilt shifts as well. The ones that I have had experience with as of now are Macro, Pinhole, and Fisheye. I don't have a fisheye at the moment but I have used then before and am not a fan.

_DSC8079.jpg _DSC8122.jpg

Macro lenses project the image onto the film or sensor at a 1 to 1 ratio or larger. This means that the image on the sensor is the same size as the subject. With a Sony crop sensor (23.5 x 15.6mm) an image of a dime (17.91mm) would not completely fit on the sensor. There are lenses that have a greater than 1 to 1 ration, there are close up filters, and there is also the technique of reverse mounting a lens. I haven't had a chance to experiment with a greater than 1 to 1 lens, Canon MP-E65 is the only one I can even think of (1x to 5x magnification). There are also some zoom lenses out there that say Macro on them and get you a 1 to 2 or 1 to 4 life size, they are not true macro but they are a step if you want to try it out.

_DSC6566.JPG _DSC6567.JPG

I have tried close up filters when I got my first DSLR (a Canon XTi) and didn't have much luck with them. It goes back to the quality of the glass that you put in front of your lens the ones I had were cheap and came with the camera from an aftermarket seller. Update: I found an old close up +3 filter and tried it on my 75-300mm Minolta. First image is without the filter at 75mm, the second image is with the filter at 75mm. All I did was move the tape measure roughly 3 ft closer to the camera.

Reverse mounting lenses I have tried with minimal success, I might not have given it enough of a chance. It was a dual threaded empty filter ring and the front elements of the lenses were front to front, focusing was done by moving the camera back and forth. There was very limited control and the depth of field was razor thin. If I recall correctly I had part of an insects eye in focus and part out of focus. I will look for some of the results from using it and post them here.

_DSC8211.jpg _DSC8212.jpg 20171105_215952.jpg 20171105_220020.jpg

Pinhole lenses, lens is a little misleading, are a small hole that allows light into the camera. Most lenses have a range of f22 to f32 for the f-stop. Each whole stop, DSLRs can generally to 1/2 and 1/3 stops, halves or doubles the size of the aperture depending on if we are making in smaller or bigger. The pinhole in the picture above is around f190 and it roughly equates to a 50mm lens. The clear image above is a 50mm at f7.1 and the not so clear image is about 50mm and f190. If we are serious about pinhole photography then we can alter the thickness of the foil to obtain a more clear picture. I have found interesting images when searching with the parameters of “pinhole” “sun” and “long exposure.” In this case diffraction is the cause of the blurriness and this is the reason that we should probably stick to an aperture around f9 while using a lens. Going from f22 or f32 to f190 is about 6 stops (1.5% of the light) and about 5 stops (3% of the light) respectively. If we have a scene where detail isn't as important as the play of color and light vs dark then a pinhole is great. There are products we could buy for this type of photography or we could make one ourselves. All that is needed is a spare camera cover, a drill, foil, tape, and a needle. I used and insulin needle which I believe was a 31g. Pictures 3 and 4 in this slide show above show my finished result. Personally it is fun to play around with but I have yet to produce a worth while picture with it. That is all I have so go out and shoot.

~Scott


tags: education, teaching, macro, pinhole, specialty, lens, aperture
Sunday 11.05.17
Posted by Scott W Gonzalez
Comments: 1
 

Equipment: Lenses

Good Evening,

We haven't really talked about primary equipment. It probably should have been done before filters. Let's start with lenses. The camera lens focuses light onto the sensor through an assortment of different shaped lenses inside of it. The eye changes focus by changing the shape of the lens with small muscles and this is how we have such a wide range of focus, from around 6 inches in front of our eyes to infinity. Glass lenses can't, at this time, change shape like that so they change the distance between the pieces of glass for a similar effect. The aperture takes the place of the pupil, opening and closing to let more or less light in as the situation demands. The aperture affects the image as well with things such as bokeh and starbursts.

There are many types of lenses which can be broken down pretty far. I am trying something new with the blog, carousels. Click on the pictures to cycle though the images.

Below is the same shot of the moon at 11mm, 18mm, and 35mm.

11mm.jpg
18mm.jpg
35mm.jpg

Wide angle - used for landscapes, cityscapes, and interiors (this would also include ultra wide lenses). Depending on the person this is anything less than 35mm in crop sensor and 50mm in full frame there is wiggle room in those numbers though. There is a wide angle of view on these lenses, not as wide as the human eye though which is about 180 degrees if you have both eyes functioning. For example an 11mm lens on a crop sensor has 104 degree angle of view, a 35mm has 42 degree, and a 50mm has 32 degree.

Below is the moon at 50mm and 70mm.

50mm.jpg 70mm.jpg

Normal angle - used for portraits, general shooting. This focal length is more or less how the eye sees the world. If we open both eyes while looking though the view finder each eye will see everything about the same size. For full frame I always heard 50mm and I have heard the same for crop sensors too which doesn't make sense. I just picked up a full frame (FF) and crop sensor (crop) camera and found it to be around 50mm for the crop and 70mm or so for the FF. More or less anything between wide and telephoto.

Below is at 100mm and 300mm which is about a typical or so range for a telephoto zoom.

100mm.jpg 300mm.jpg

Telephoto lens - used for sports, wildlife, celestial events, aviation. This type of lens brings everything in close. On the lower focal end they have use in portrait photography and macro photography. The price that we pay to get far away object closer is we loose wide angle of view. As an example a 75-300mm lens has field of view range of 21 - 5 degrees on a crop. If we want a close up of a bird or the moon then we don't need those extra degrees though.

Then there are zooms and fixed. Fixed lenses can often have wider aperture, can cost less, and can be sharper. We have to have many of them though or decide to "zoom" with our feet. Zoom lenses cover many focal lengths, the downside is that they are usually more expensive, they might have apertures that aren't as wide, and less expensive ones might not be as sharp. We come to a point where we make a decision of one over the other and deal with the downsides. I have both zooms and fixed and take which ones I need on each outing that I feel will be suit me. Now lenses don't only have to fit into these boxes. A telephoto lens can be used for landscapes and a wide angle can be used for sports and celestial events. Be creative and see what works for each situation.

I feel that lenses are worth more of an investment than the camera. I have multiple lenses that are still functioning fine that were discontinued in the mid 80s. It was all film back then. If a lens is taken care of it will last longer than the camera it came with. We can get into specialty lenses at a later date. Now go out and shoot.

tags: lens, equipment, education, teaching, zoom, fixed, telephoto, normal, wide angle
Sunday 10.22.17
Posted by Scott W Gonzalez
 

Filter: Neutral Density Filters aka ND

Good Evening,

Today the little ones and I went to Red Rock Canyon. I brought along some ND filters to show what they can do.

ND filters are basically like putting sunglasses on a camera. They darken the whole thing. There are a few reasons to want to do this. Wanting to use a large aperture to have a shallow depth of field, wanting a long or longer exposure time, making flowing water silky, removing people from a busy location. They come in different strengths. Just like CPL filters they can be costly and we can buy one set for our largest thread lens and then step rings for the rest of the lens. Ultimately we want a filter that darkens the frame evenly without adding a color cast.

I did not use an ND filter for either of these images. I was testing a new lens and seeing what I could get out of it. I was planning on taking some water images today but alas didn't get the chance as there hasn't been any recent rain. This does gi…

I did not use an ND filter for either of these images. I was testing a new lens and seeing what I could get out of it. I was planning on taking some water images today but alas didn't get the chance as there hasn't been any recent rain. This does give an idea of what an ND filter can do to a scene though.

There are also graduated ND filters which are used to darken a bright sky over a landscape so both can be seen. They come in both screw on filters and in a square filter with a holder. Just like the regular ones also come in different strengths.

Here is what I shot today with the girls. Notice both are about even on the ground but with the grad ND the sky looks better and not as blown out. For a scene like this I should have had the grad tilted more toward the sun on the left. I tried it bu…

Here is what I shot today with the girls. Notice both are about even on the ground but with the grad ND the sky looks better and not as blown out. For a scene like this I should have had the grad tilted more toward the sun on the left. I tried it but wasn't paying attention and got my finger in the frame because I was talking to children.

As for removing people from scenes I have pictures of them removed but no before shots. If I go to a populated area where people are moving I will get it. Until then see where an ND might fit into your needs. Now go out and shoot.

~Scott

tags: ND, neutral, density, filter, teaching, camera, education, example, equipment, long exposure, exposure
Sunday 10.15.17
Posted by Scott W Gonzalez
 

Settings

Good early morning,

I am going a little off the plan. I didn't plan for anything horrific to happen when I said I would be talking about filters part 2 ND filters. It did though and I have spent time out helping with recovery and memorial efforts. So today I am going to discuss something that happened to me today.

Generally I shoot in RAW, sometimes I use the small jpeg for things that shouldn't need editing. I took some in jpeg format and forgot to change it back. I took my daughters out hiking today for a picnic dinner, to get away from the TV, social media, radio, and to take some pictures. After picking up my A77 and checking the charge I noticed that it was on jpeg. I changed it to RAW before I took out the battery, so I wouldn't forget. After getting to RRNC and taking a few dozen pictures I realized that they were jpegs again. So the moral of the story is to change your settings back to your normal after the shoot and check it before the shoot too. It sucks to think you have all this latitude with a RAW file only to find you have a jpeg that is reduced from a 24 meg to a 6 meg file. Luckily it wasn't anything that I was being paid for it was all just fun with my daughters.

This is the 5 year old. If you didn't know she was laughing that might almost look like a surprised I fell expression.

This is the 5 year old. If you didn't know she was laughing that might almost look like a surprised I fell expression.

This is the 6 almost 7 year old, we have to work on her acting.

This is the 6 almost 7 year old, we have to work on her acting.

Even with all the things going on around us we can still find times for fun and pictures. There was some stargazing which will probably be worked into a future discussion. I am not sure about other camera systems and if they are the same as Sony in this regard, I believe that removing the power source changes the settings back to what they were for the last capture. So double check before you shoot. I should be back on track next week and I will get some photos on the CPL post too. Now go out and shoot.

~Scott

tags: setting, mistake, camera, reset, preshoot
Sunday 10.08.17
Posted by Scott W Gonzalez
Comments: 1
 

Filters: Circular Polarizer aka CPL

Good Evening,

I thank you ahead of time for your patience, pictures will follow later for this post. This weekend has been busy, I still have to go through pictures from my 5 year old's birthday party.

Today I am going to talk about equipment starting with filters. Let me start off with saying we want good filters. Anything we put in front of the lens alters the quality of the light hitting the sensor. Poorly made filters will potentially degrade the image quality and/or have color casts. Most filter effects can be done in the camera or in post processing. The ones that can't without difficulty are CPL and Neutral Density aka ND, normal ones and graduated ones too.

We are going to talk about CPL filters which have some useful effects today. They can increase the contrast of the scene which can be very useful in landscapes and images with some clouds in the sky or both, limit reflections on water and non metallic surfaces, reduce glare, make flat screen images disappear, and make plants look more vibrant. I have also read that they make rainbows more prominent in photos, I have never had a chance to test it.

Here is the difference it makes in the sky with clouds, darker greens can be noticed on the tree too.

Here is the difference it makes in the sky with clouds, darker greens can be noticed on the tree too.

Some out there may be thinking that all of these things are great let's get one and leave it on the lens all the time, there are some drawbacks. A good one is usually expensive, so I recommend getting a good quality one that fits your largest lens then step rings for the smaller lenses. They decrease the amount of light hitting the sensor by a stop or so. The effect isn't as great on an ultra wide lens.

I have used Hoya, BW, and Tiffen with good effect. Get one if you are so inclined and go out and shoot.

~Scott

tags: CPL, learning, education, teaching, filter, equipment, polarizer
Sunday 10.01.17
Posted by Scott W Gonzalez
Comments: 1
 

Rule of Thirds

Good Evening,

Quick update from last week. The colored histograms are just a measure of how much light of that color there is. Being more than 3 colors in the histograms through lightroom I was a little perplexed.

Now on to the rule of thirds.

The rule of thirds basically states to put a subject or focus not in the center of a rectangular image. If we make a 3 by 3 grid in our image the focus should be on one of the lines to make the picture appealing to the eye, it was first written down by John Thomas Smith in 1783.

One of the big places that it causes issues is horizons. If we are taking a landscape, seascape, cityscape, etc we generally don't want the horizon in the middle. We want it a third from the top or bottom. It changes the focus of the image. For example if the sky is just a blue sky with no clouds or lacks anything interesting while the city in the lower portion has action that adds to the image then leave less sky and more city and now the sky is background. If the sky has something going on such as stars, clouds, a sunset/sunrise then if we leave more sky and the lower portion becomes foreground interest. It depends on what we are trying to do with the image.


Here is a picture of the pier in Oceanside, CA. The top image has the horizon in the bottom 3rd, the bottom has it in the top 3rd, and the middle image is the original. Now look at each image and see where our eye is drawn and how that effects what …

Here is a picture of the pier in Oceanside, CA. The top image has the horizon in the bottom 3rd, the bottom has it in the top 3rd, and the middle image is the original. Now look at each image and see where our eye is drawn and how that effects what the image is about. 

If we are taking portraits then we should focus on the eyes, sharply focused eyes draw a person in and make it look more alive. When we talk to people most people focus on the other person's eyes. So the eyes are the focal point not the subject. If we place the eyes on one of the thirds lines then it takes the person out of the center of the image. Generally placing the eyes on the top 3rd line brings the focus to the person and not the scene and placing the eyes on the bottom 3rd line shows less of the person and brings attention to where they are.

This is Lumina, my youngest daughter. The image on the left has her eyes at the top 3rd, the image on the right her eyes are on the bottom 3rd, and the image in the middle is the original. Again notice where our eyes wander in each image. Are they m…

This is Lumina, my youngest daughter. The image on the left has her eyes at the top 3rd, the image on the right her eyes are on the bottom 3rd, and the image in the middle is the original. Again notice where our eyes wander in each image. Are they more on her or more on her surroundings?

Granted this is not always the case and there are times to break the rules. However if we want to break the rules we have to know the rules first. I will go more into rule breaking some other week.

Most digital cameras have a rule of thirds setting on them where a grid will be places on the screen and it can help with subject placement. Owners manuals are helpful for finding it. Sometimes though it is easier to put things you want in focus right in the middle and crop them later. These images are an example of that too. Try it both ways and see what works for you. Now go out and shoot.

~Scott

Sunday 09.24.17
Posted by Scott W Gonzalez
 

Histogram and Perfect Exposure

Good evening,

Today I am going to talk about the histogram which is I believe the defining thing for a "perfect exposure." The histogram is a graph of how much brightness vs darkness you have in an image. On the left we have black and on the right we have white, then bottom to top is how much you have in each. Some histograms like below have colors to go along with them and others just have a black and white graph.

Middle Histogram.JPG

Perfect

This is what our histogram would say is a "perfect" exposure. Not that there is anything wrong with it. Notice on the histogram that everything is right in the middle nothing goes all the way off to the sides or the top.

This is what our histogram would say is a "perfect" exposure. Not that there is anything wrong with it. Notice on the histogram that everything is right in the middle nothing goes all the way off to the sides or the top.

Hightlight histogram.JPG

Highlight

Here we have a highlight image. My daughter was sitting in a little alcove to get out of the sun. If you notice on the histogram there is a spike all the way to the right and some even goes off of it. This is called clipping, in this case highlight …

Here we have a highlight image. My daughter was sitting in a little alcove to get out of the sun. If you notice on the histogram there is a spike all the way to the right and some even goes off of it. This is called clipping, in this case highlight clipping, which means there is no image detail in that area it is just white. Generally not a desired characteristic in images. Leaving the image with the highlights shows that it was a really bright day and there was a need to seek shade from the blazing sun. Not "perfect." It works though with what I wanted to express.

Shadow Histogram.JPG

Shadow

Now it is the opposite end, shadow clipping. Parts of the pier have no detail, there is also highlights in this where the sun is. I can brighten it but then I start to get to many highlights, I would prefer to just leave the pier as a silhouette so …

Now it is the opposite end, shadow clipping. Parts of the pier have no detail, there is also highlights in this where the sun is. I can brighten it but then I start to get to many highlights, I would prefer to just leave the pier as a silhouette so that I can retain colors in the sky and the reflection. Again not "perfect." It portrays what I wanted though and the way that I saw it.

The camera wants to make the images be in middle ground. Sometimes that doesn't leave us with an image that portrays the mood or feel of what we see at the moment. So we change it and take control away from the camera. If we are in the semi manual modes then we can use exposure compensation (it looks like a little +/- icon) to make the image our own. or go to full manual and have complete control over the exposure.

In manual if we want it a little darker or brighter we can just make an adjustment to the shutter, aperture, or iso to achieve the desired effect. each one can change the way the picture looks as previously discussed. Now go out and shoot. Enjoy it, experiment.

~Scott

tags: education, exposure, exposure triangle, teaching, learning, histogram, perfect
Sunday 09.17.17
Posted by Scott W Gonzalez
Comments: 1
 
Newer / Older

Powered by Squarespace.