• Photography
  • About
  • Contact
  • Light Writing

Scott W Gonzalez

  • Photography
  • About
  • Contact
  • Light Writing

Constant Lighting Situation

Good evening,

Tonight we are going to talk about indoor lighting or constant light. Quite a few people this holiday season are going to be in a situation where the light is constant, however this can trick our sensors. Let's say we are indoors at a dinner with the family and decide to take some candid shots. The lighting at the table is relatively constant. Now our cousin is wearing a dark red sweater and our uncle is wearing a light salmon colored shirt. If we focus on our cousin the exposure is too bright and if we focus on our uncle the exposure is too dark. So what is a photographer to do in this situation. Turn it to manual mode then set the shutter and aperture to were it exposes everyone one the way we want.

_DSC9967.JPG
_DSC9968.JPG
_DSC9969.JPG

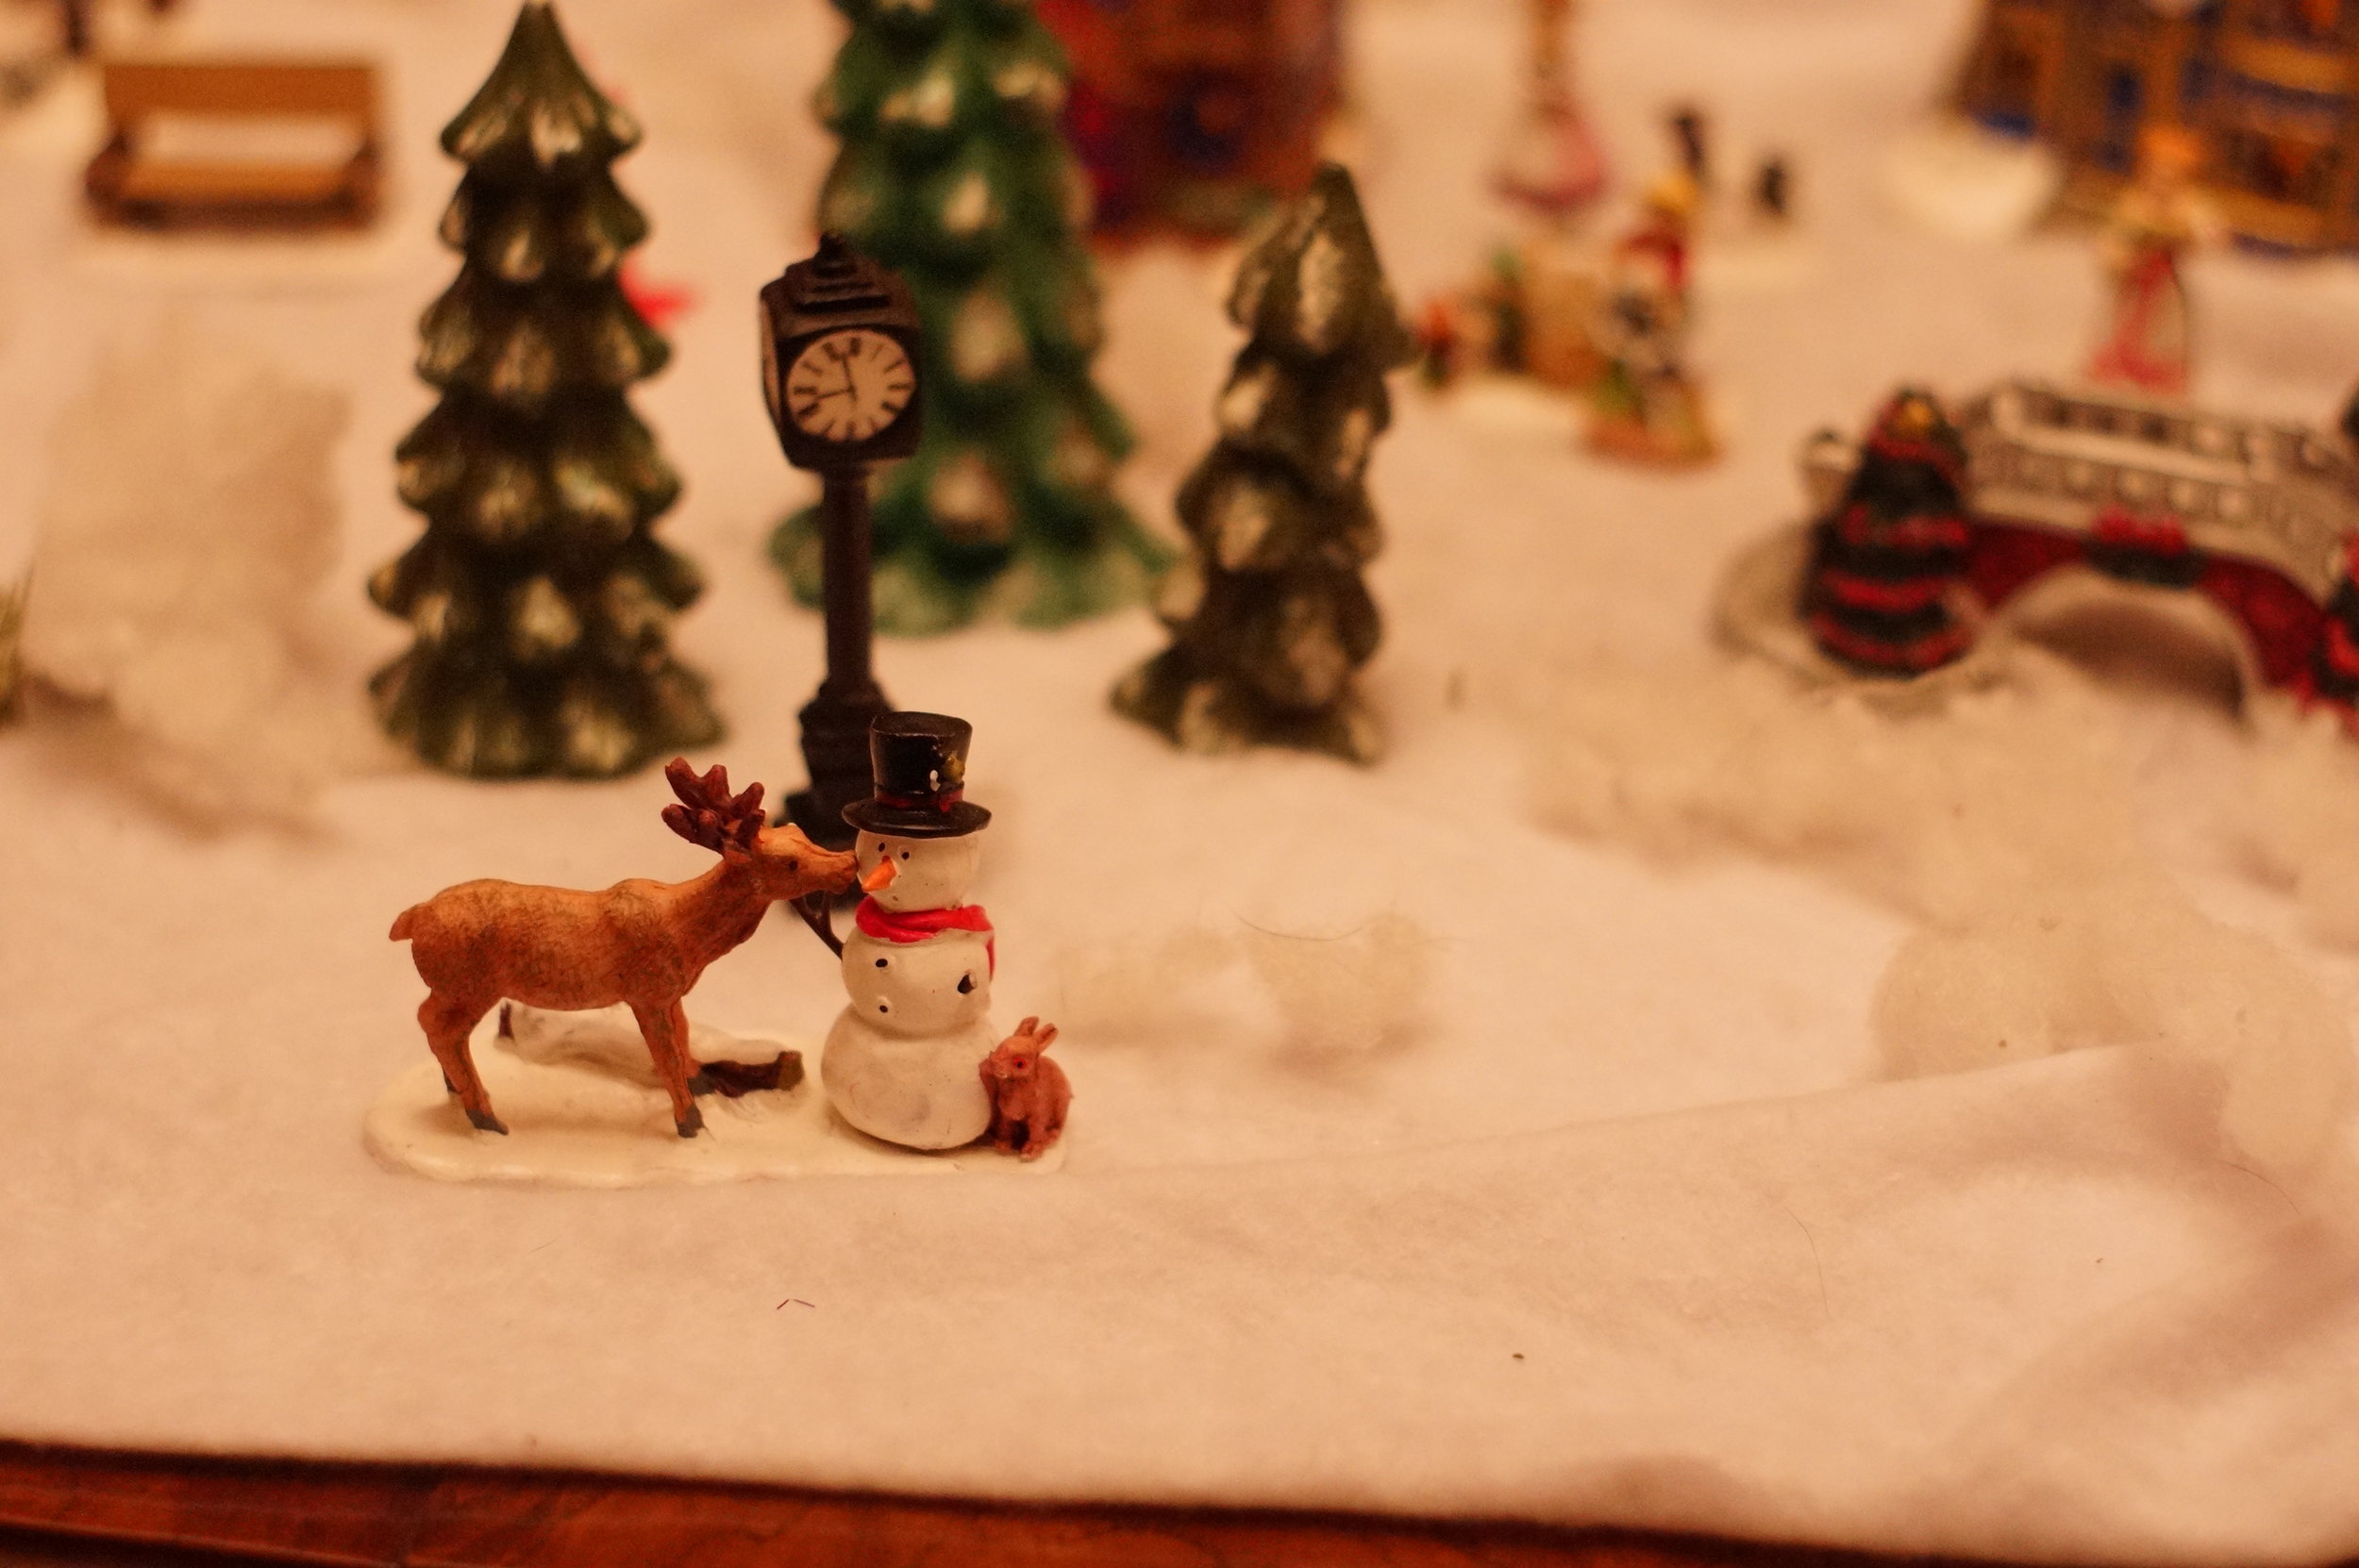
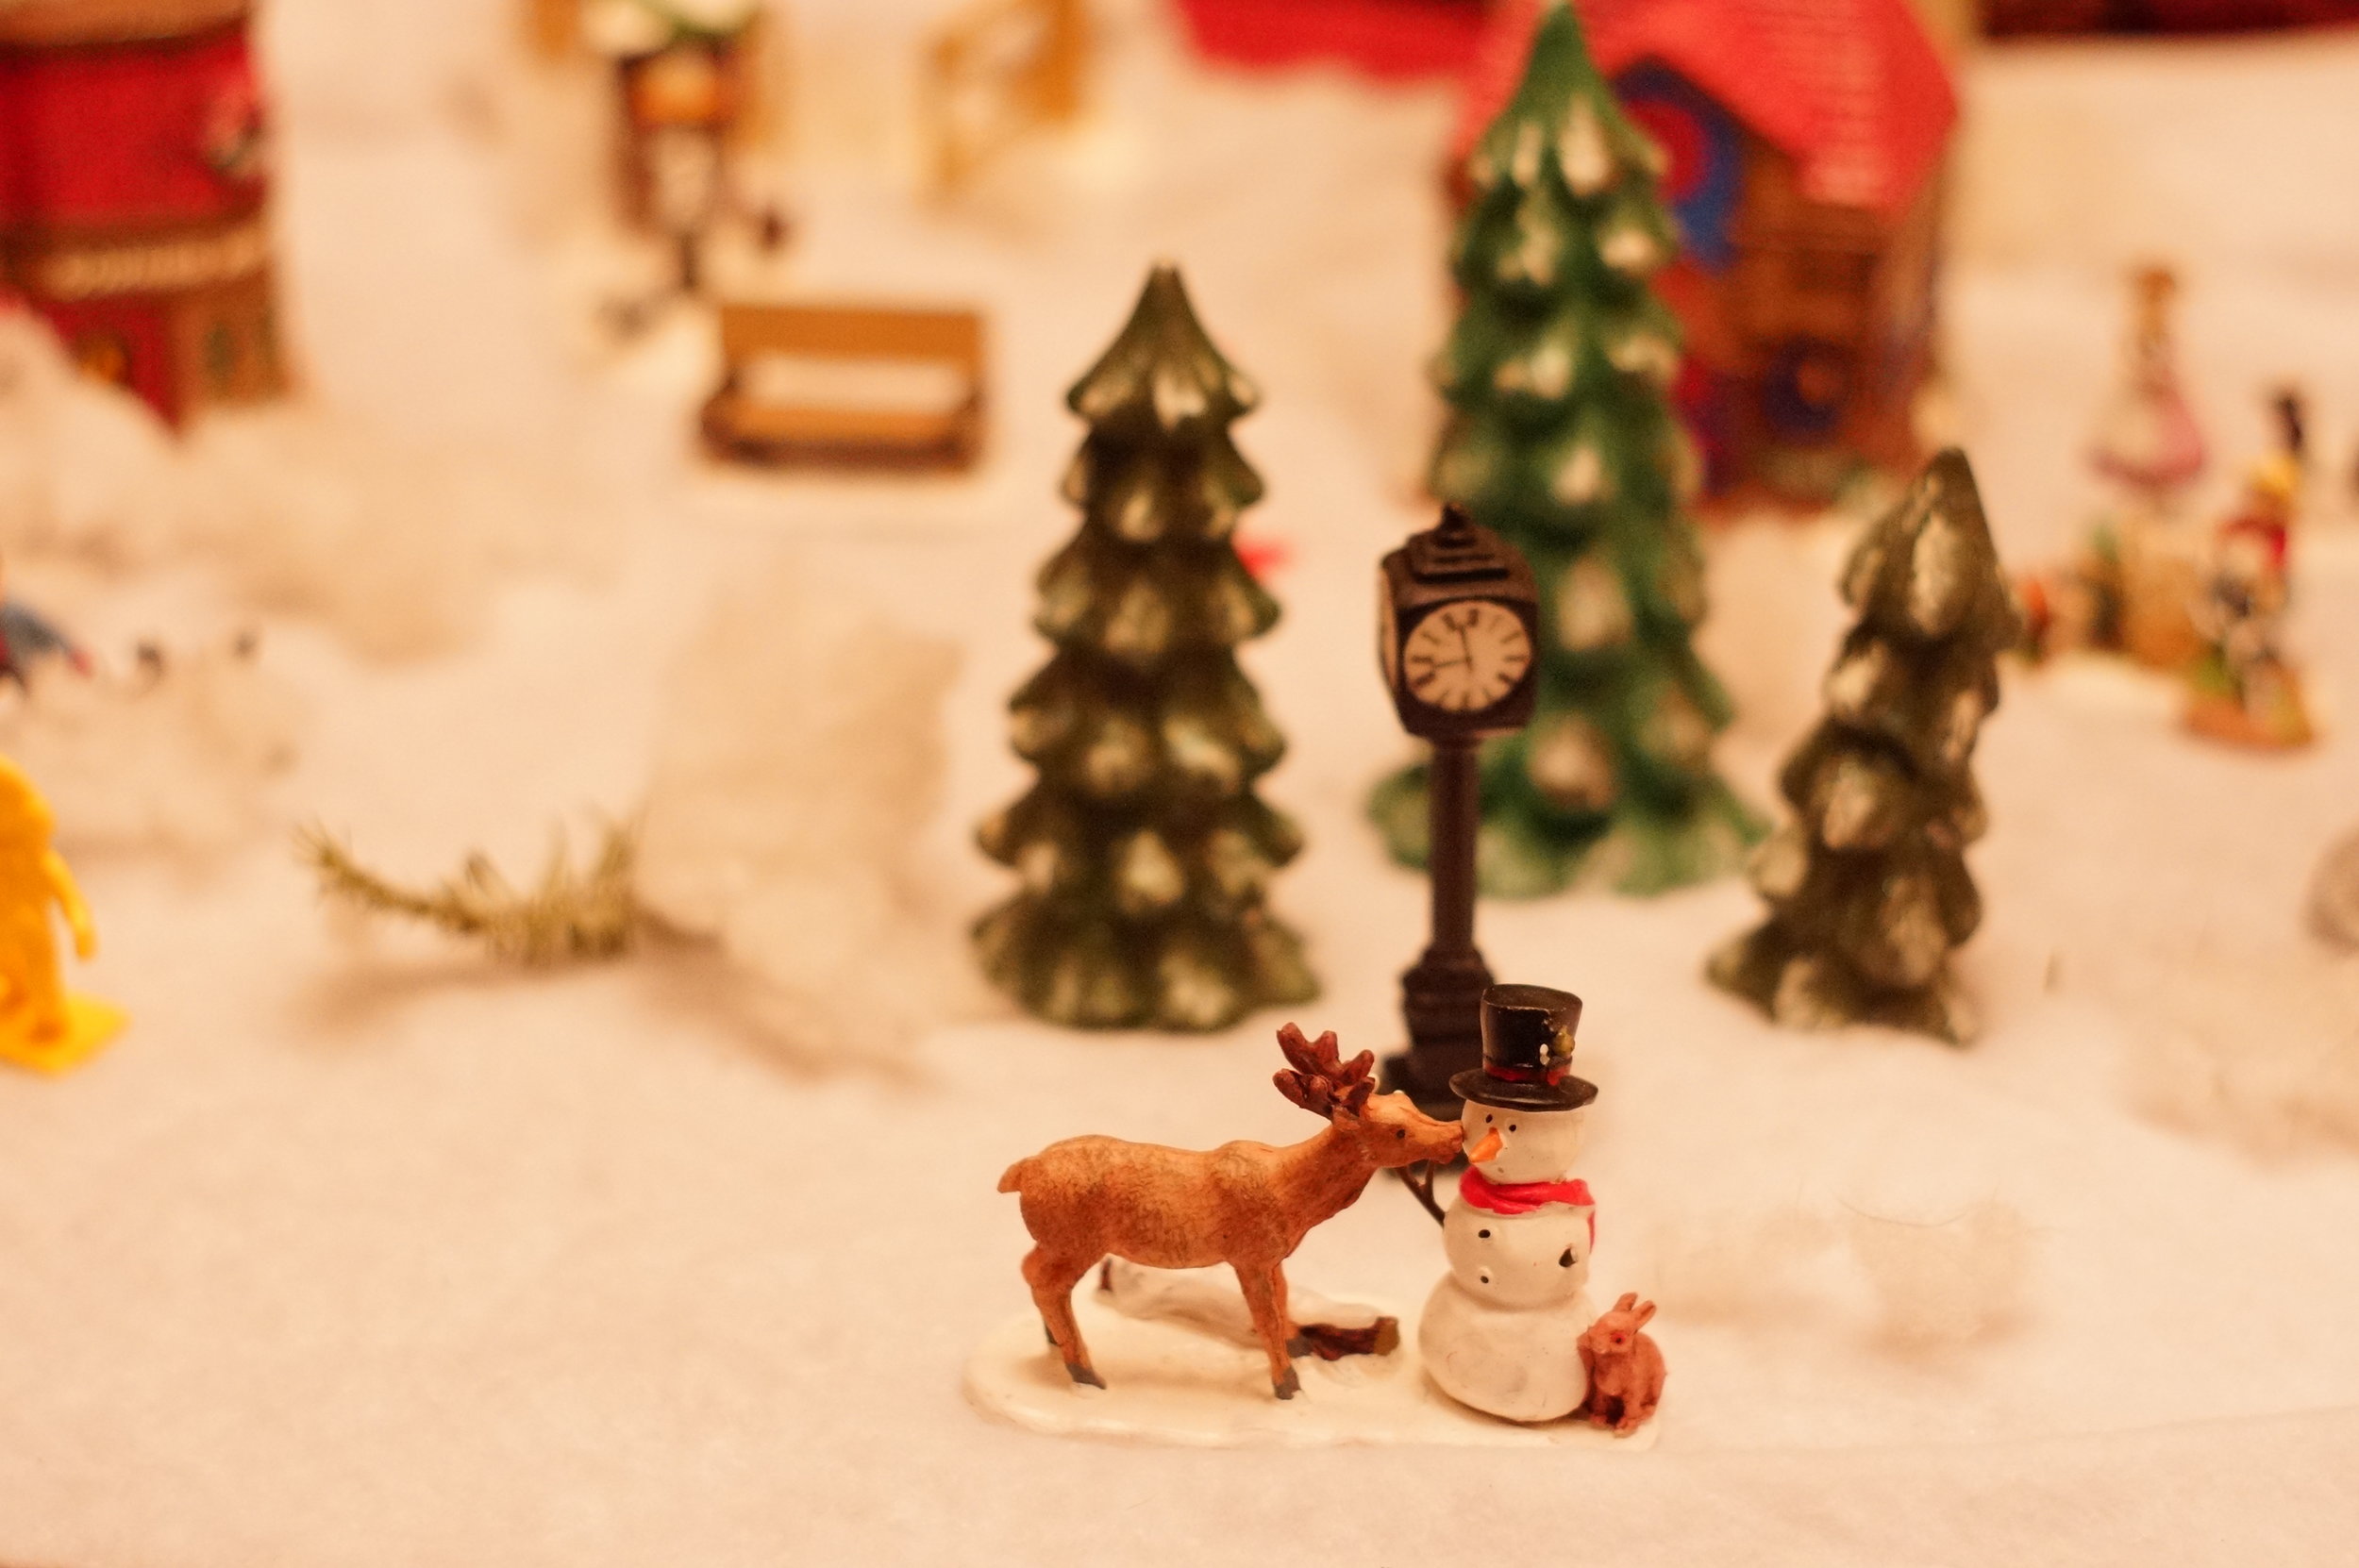
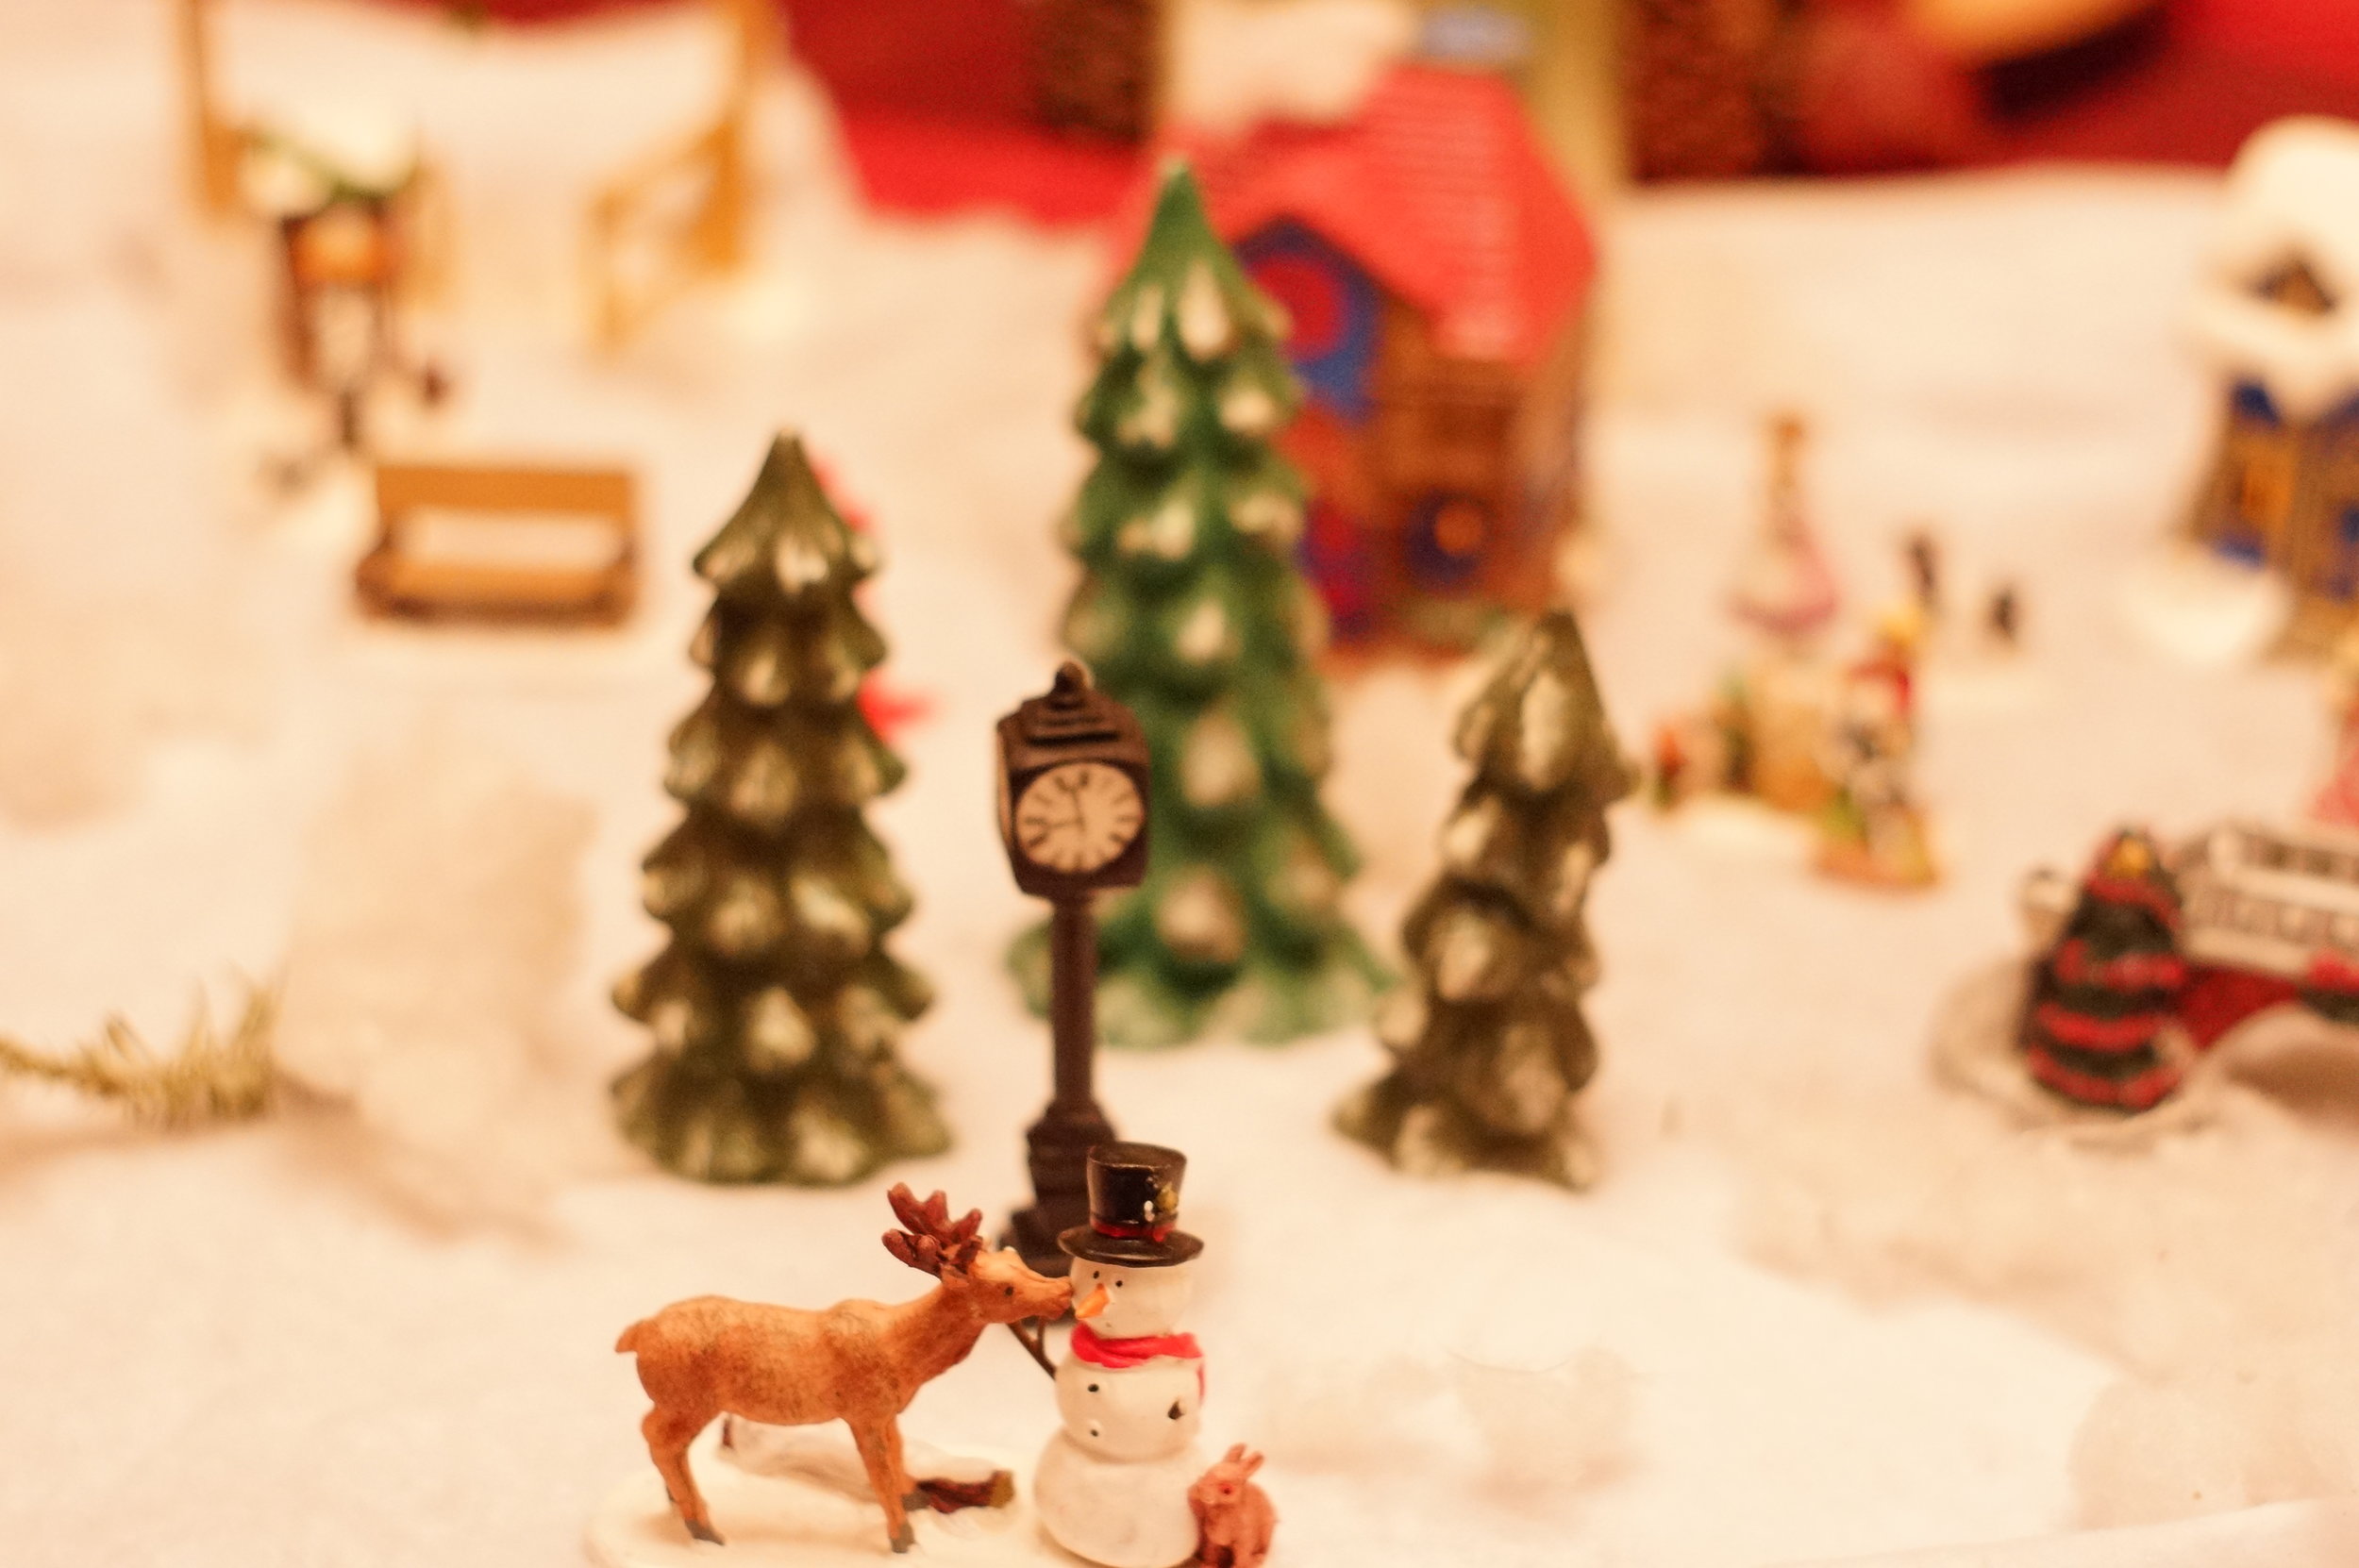
In this example we have my Wife's Christmas Village. The metering spot was changed by a few inches for each image which resulted in 1 stop of exposure difference. The difference between an uncle and a cousin would probably be greater and so would the small light changes. These were shot in Av mode the first was metering from the snow 1/160s, second was on the reindeer 1/125s, and third was on the pine trees 1/80s. In this example the difference could be made up easily in post. With holiday photos most people want them sooner rather than later so the less editing that needs to be done the better. If possible adjust the settings before hand, if not use your preferred setting to get an idea of where you want to be then lock those settings in using manual. Those split second moments don't wait for a cameras metering system. So switch it to manual this holiday season and go out and shoot.

~Scott

tags: manual, aperture, adjustment, family, holidays, program, shutter, priority
Tuesday 12.05.17
Posted by Scott W Gonzalez
Comments: 1
 

Shutter Priority

Good Evening,

Shutter priority is not one that I use often. There is nothing wrong with it I just never really used it. After taking this series of photos I will make an effort to use it. I have seen the times that it could be useful. Such as when being more worried about stopping motion in the image as opposed to having a certain amount of the photo in focus. You control the shutter speed and ISO then the camera sets the aperture (or tries to within the lens limits) to what would make a "perfect" aperture using the exposure triangle.

If you are taking pictures of cars in motion, people running or playing sports, you have an artistic idea that has some motion blur and you want to control how much is blurred, you are trying to make a busy place look empty, taking pictures of fans, etc, then this would probably be the way to go. It can be used for all of those and more.

Shutter.jpg

These images were taken at 800 iso with a tripod mounted camera. The first was and last images had a blinking aperture which means each was outside of the "perfect" exposure. 1/640 sec was a stop below what the aperture could adjust for and 1/2 second was a stop above. If you notice the first one is dark compared to the others and the last is brighter. Again we can see the triangle at work in these captures. For each stop (keep in mind these are full stops) the the shutter speed changes the aperture changes one stop too. I know that Sony and Canon have the option, not sure about Nikon I haven't used them enough, to change the stop adjustment to either 1/3 stop or 1/2 stop when changing the shutter speed or aperture. I hope this collage provides a good example of shutter speed adjustments. Now go out and shoot.

~Scott

tags: shutter, speed, adjustment, priority, exposure triangle, exposure, teaching, learning, example, collage
Sunday 09.03.17
Posted by Scott W Gonzalez
 

Aperture priority

Good Evening,

I figured that I would take a step into mode dial settings. I was discussing it with a fellow patron of the B&B the Wife and I stayed at to see the eclipse. He asked for some pointers and I gave him what I could in the short time we saw each other. The discussion went to the mode dial and how to use it.

Most of the time I use Aperture priority (A or Av). I like to have control of depth of field. This is again a personal preference, and just one corner of the triangle. If it doesn't work for me then I usually jump to Manual. I put together this image to illustrate the difference.

Aperture.jpg

All were shot at 400 iso in jpeg from an a57 with a 28mm lend mounted on a small tripod. Each time I went up a full stop (smaller number smaller in focus area) in the aperture and in turn the shutter went up a full stop too, to compensate for the light change. The difference between all of them is how much of the keyboard is in focus. The aperture controls depth of field and is a great tool to isolate what we want in focus in an image. It is also good for low light situations as well. If you are in one you can open it wide which allows more light in a shorter period of time. Such as a birthday party when the candles are lighting up a face, with a wide aperture you can have other people blur away if you know what you are doing. Go out and shoot.

~Scott

tags: aperture, exposure, exposure triangle, education, example, teaching, learning, shutter
Sunday 08.27.17
Posted by Scott W Gonzalez
 

Exposure Triangle

Good Morning,

The exposure triangle. It seems like a simple concept if you understand some photography. It starts off with "perfect" exposure in the middle, ISO on one corner, shutter speed on another, and aperture on the last. Showing that it you change one it has an effect on the other ones to maintain the "perfect" exposure in the middle. If we change the shutter speed one stop we can either change the ISO 1 stop or the aperture 1 stop, or a combination ISO 1/3 and aperture 2/3 and so forth.

There have been many alliterations of this. I am going to use my own. Imagine cooking an egg. Sunny side up is a "perfect" exposure, with the fire being the aperture, time being the shutter speed, and the pan the ISO. If we have a small fire (small aperture, high f stop), then we would have to either more the pan closer to the fire (increase the ISO) or cook it for longer (keep the shutter open for longer) to cook the "perfect" egg, if we didn't change something then the egg would be under cooked (underexposed) and we risk getting salmonella. Now if we have a large fire (large aperture, small f stop), then we could move the pan, or we could cook the egg for a shorter period of time. If we didn't change something then the egg would be burnt (overexposed). I could go on all day typing each option changing and the others but I am not going to, I think that you probably get it with those two.

After understanding it you can use it to take better pictures that are outside of the "perfect" exposure. Going back to the egg story, some people want their eggs runny, others like them a bit dry. Is either way wrong? No it is a personal preference. The "perfect" exposure doesn't have leeway for those preferences. That is a story for another day though. So go out and shoot.

~Scott

tags: exposure triangle, education, exposure, teaching, learning, speed, shutter, adjustment, aperture, ISO
Thursday 08.17.17
Posted by Scott W Gonzalez
 

Powered by Squarespace.